


How are the indoors feeling, Mom and Dad? Have you been wondering how to keep your ever-energetic child occupied at home? Don’t worry, we won’t let you run out of ideas! Case in point: in this article, we have compiled a list of some truly simple and fun things that you and your child can create from straws! Your child must have used many straws this summer to quench their thirst with cool drinks. Throwing them away is not exactly the best for the environment. So, how about you clean them and turn them into some fun art and craft projects? Doesn’t that sound interesting? Come on, let’s dive into them!
Thank you for reading this post, don't forget to subscribe!
- Decorative Photo Frames
Age group: 3 – 4 years, 4 – 6 years

What you need:
- Plain photo frame
- Straws (striped/coloured)
- Scissors
- Glue
- Marker/pencil
Instructions:
- Take a plain photo frame that your child can decorate.
- Then, help your child gather up all the coloured/striped straws in the house.
- Together, decide what kind of pattern you want to make with the straws. It can be a horizontal design (as shown in the image), a vertical design, a horizontal + vertical design, or a diagonal design.
- Next, measure the straws along the photo frame, and find out how many straws you need, and what their length should be (according to the chosen design!).
- Help your child mark the point on the straws where they should be cut off. Then, using kid-friendly scissors, cut the straws according to the length you want.
- Then, using the glue, paste the straws one by one on the photo frame.
- Lastly, if you wish, you can paste stickers, paper flowers, butterflies, or sprinkle glitter on the straw-covered frame.
2. Fireworks Art Project
Age group: 2 – 3 years, 3 – 4 years, 4 – 6 years
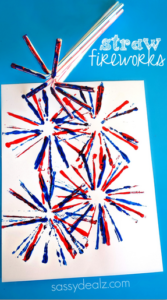
What you need:
- Plain paper
- Bendy straws (about 6 to 7)
- Tape and scissors
- Paints
- Containers
Instructions:
- Firstly, let your child bend each straw as far it can go.
- Then, arrange the straws such that the bent parts are facing outwards, and the entire shape looks like a star. Tape the bundle tightly together near the bottom, and right under the bent portions of the straws.
- Next, take out some paints in different containers. Let your child pick at least two colours; you can use more if you like!
- Now, here comes the fun part! Lay out the sheet of plain paper. Let your child dip the star-shaped straw bundle in one colour of paint first, and press it firmly on the paper. Repeat this all over the paper. Let the paper dry.
- Let the paint on the straws dry, or wipe it off quickly. Then, let your child dip the straws in another colour, and press it firmly near the first colour on the paper. Repeat all over the paper, and let dry.
- If you like, you can use a third colour!
3. Hawaiian Lei
Age group: 3 – 4 years, 4 – 6 years

What you need:
- Large flower-shape punch
- Coloured paper (any colour of choice)
- Striped/coloured straws
- Scissors
- Hole punch
- Yarn/thick thread
Instructions:
- First, cut up the straws into 1-inch long pieces.
- Next, let your child use the flower-shape punch to cut out several flower shapes from coloured paper. Alternatively, if you don’t have a shape punch, simply draw and cut flower shapes from coloured paper.
- Then, use the hole punch to make a hole in the middle of each flower.
- Now, take the yarn or thick thread, and help your child to thread it through the straw pieces and flowers. Alternate the straw pieces and the flowers.
- Make the lei (necklace) as long as your child wants to wear it. Once it is of desired length, cut off the yarn with some extra length to be able to make a knot.
- The lei is ready to wear!
4. Straw Beads
Age group: 4 – 6 years

What you need:
- Straws (plains/striped)
- Embroidery threads/yarn
- Scissors
- Liquid glue
Instructions:
- First, let’s wrap the straws with the embroidery threads or yarn. (Don’t choose thick yarn!)
- If using striped straws, try to choose threads whose colours match the stripes.
- Your child can start by applying liquid glue to the first inch of a straw. Help him wrap the thread quickly but carefully around the straw, making sure to leave no spaces. Repeat the same process of applying glue and wrapping the thread around until the straws are fully covered.
- Allow the glue to dry completely.
- Then, take a pair of sharp and strong scissors, and cut the straws in different lengths, to make different-sized beads of various colours.
- These beads can now be used to make accessories!
5. Marble Maze Game
Age group: 4 – 6 years

What you need:
- Thick straws/normal straws
- Scissors
- Glue
- Cardboard box
- Coloured paper (optional)
Instructions:
- First, take a cardboard box (a cereal box, for example). Carefully cut off the front, large panel of the box, so that you are left with an open box with 4 narrow sides and a large bottom.
- If your child wants, you can cover the bottom and sides of the box with coloured paper, for decoration.
- Next, it’s time to design the maze! Together with your child, decide how and where the straws should be placed to make a fun puzzle game. You can mark the points on the paper with a pencil for reference when pasting the straws.
- Then, it’s time to cut up the straws for the maze. You can use thick straws (preferably!), or normal straws will also work. But, make sure they’re not too thin, as the marble or ball might just roll over them.
- Make the straws of different lengths. Paste them onto the paper in the box. Let dry completely.
- The maze is ready to be played with!
6. Eiffel Tower Art
Age group: 3 – 4 years, 4 – 6 years

What you need:
- Striped/coloured straws
- Plain paper
- Pencil
- Scissors
- Glue
Instructions:
- First, let’s draw an outline of the Eiffel Tower on plain paper. Don’t worry, it doesn’t have to be perfect!

- Next, help your child measure the straws against the drawing, and determine the lengths needed. Then, cut them up accordingly!
- Apply glue to each straw, and paste it onto the drawing on the paper.
- Your straw Eiffel Tower is ready for display!
7. Party Blowers
Age group: 4 – 6 years

What you need:
- Straws
- Wrapping paper
- Thin crepe paper/coloured paper
- Scissors
- Glue
- Pencil and ruler
Introductions:
- Let’s begin by making the blower first by using the wrapping paper. (This is a great way to use leftover wrapping paper!)
- Let your child draw and cut out a rectangle from the paper, about 3.25 inches wide and 10 inches long.
- From the width, measure one inch from each side, and fold over the long sides. You’ll find that they overlap.
- Apply a thin line of glue where the folds overlap, and stick them together. Let dry.
- Next, fold over a little of one narrow end of the strip, and glue it down. Let dry.
- Then, from that glued end, roll over the strip tightly around a pencil, till it just reaches the open end. Secure the roll with a paper clip for a few hours (or even overnight) so that it will retain that shape.
- After that, cut a straw in half, and insert one half of it into the open end of the blower. Fold the blower’s corners onto the straw, and glue them down.
- For the last step, take the thin crepe paper/coloured paper, cut long fringes on one side of it, and attach the other side to the straw around the blower.
- To use, blow air through the straw, and the blower will unfurl!
8. Decorative Cake Toppers
Age group: 4 – 6 years

What you need:
- Straws (striped/coloured)
- Sharp skewers
- Scissors
Introductions:
- Mom and Dad, this activity definitely requires your supervision, as it uses sharp and pointy things!
- Let’s start by cutting different coloured straws into 1.5 inch long pieces. Your child can do this. For each skewer, make about 6 – 7 straw pieces.
- Mom and Dad, you should put the straws on the skewer, and your child can watch. Pierce the sharp end through the middle of each straw piece, and take them up towards the other end of the skewer.
- Arrange the straw pieces in horizontal, vertical, and diagonal orientations.
- The cake décor is ready! Next time your family is having cake, stick these colourful toppers into the cake for a festive look.
Did your child enjoy these craft projects?


