


In This Article
ADVERTISEMENTS

A fun and creative craft project for your little one!
Thank you for reading this post, don't forget to subscribe!
ADVERTISEMENTS
Age Range – 3 – 4 years
Primary Skills – Creativity, self-expression
Materials:
- Paper plate (if unavailable, use chart paper or magazine pages)
- Wooden candy sticks/cardboard
- Scissors
- Glue
- Paints/crayons/sketch pens
- Pencil
- Googly eyes (optional)
- Glitter (optional)
Instructions:
- Let’s start by making the butterfly’s wings first. You can use any of the following 3 methods:
- You can use a paper plate and have your child colour and decorate the back (non-eating side) of the plate with paints, crayons, sketch pens, etc.
- You can use a sheet of chart paper. Cut out a small plate-sized circle from it, and your child can colour and decorate the circle however he likes.
- You can use a colourful magazine page. Cut out a small plate-sized circle from it, and if it’s bright enough, there’s no need for paint or crayons!
- Once the circle is ready, help your child fold it in half and cut along the fold carefully.
- Next, draw a curved V-shape on the flat side of each half (see image for reference), and cut along the line. The wings are ready! Set them aside while you make the body.

- To make the body, you can either use wooden ice cream sticks or pieces of cardboard cut in cylindrical shapes (see image).
- Your child can decorate the body however he likes – in solid colours, stripes, patterns, etc. Let him draw eyes and a mouth at one end of the body. (See image.)
- Now, let’s paste the wings on the body. Let the curved V-shape of the wings be on the outer side. Paste each wing on the backside of the decorated body. Let dry. (See image.)
- Lastly, cut out two short and thin strips from chart paper or magazine pages to make antennae, and stick them behind the ‘face’ of the butterfly.
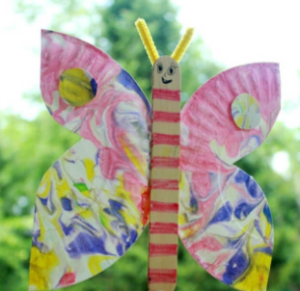
- Let your child sprinkle the butterfly with glitter, or use googly eyes on the face for a fun effect!
The butterfly is ready! How much fun was that for your little one?
ADVERTISEMENTS


