


In This Article
ADVERTISEMENTS

Thank you for reading this post, don't forget to subscribe!
A vibrant art project to enhance your child’s motor skills!
ADVERTISEMENTS
Age Range – 2 – 3 years
Primary Skills – Fine motor skills
Materials:
- Rolling pin
- Paints (regular/neon)
- Yarn
- Glue
- Plain paper/newspaper
- Large container (bigger than the rolling pin)
Instructions:
- First, let’s prepare the rolling pin. You must do this in advance, as the glue will take one day to set before doing the activity.
- If you have rolling pins of different lengths, you can make use of all of them, as they will be helpful in strengthening your child’s fine motor skills.

- Measure the length of yarn needed per rolling pin by first wrapping it around the pin in a design of your choice. Cut out the desired length.
- Dip the yarn in glue, and wrap it around the pin again. Make sure the yarn is sticking well. You may have to leave it overnight or even for a whole day.
- Once the rolling pin is ready, set out the drawing paper and the paints.
- Take out dollops of paint into a large container.
- The rolling pin will go into this container to be rolled over the paints. Help your child with this step.
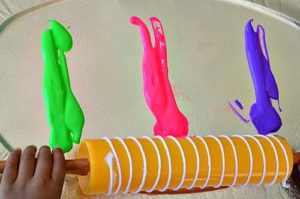
- Now, help your child roll the pin over the drawing paper. You will see the pattern of the yarn painted onto the paper! Keep rolling, dipping in paint, and rolling again.

- Let your child express his creativity and paint with the rolling pin in any way he wants.
Wasn’t that a fun activity for your little one, Mom and Dad?
ADVERTISEMENTS


