


In This Article
ADVERTISEMENTS
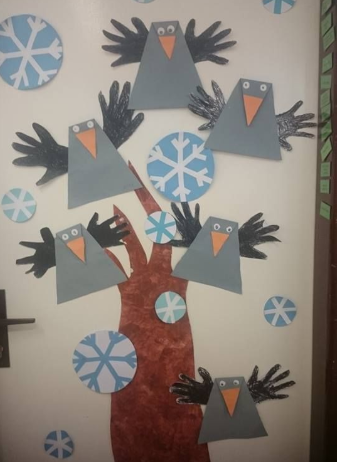
A simple and fun craft to enhance your little one’s motor skills!
Thank you for reading this post, don't forget to subscribe!
ADVERTISEMENTS
Age Range – 2 – 3 years
Primary Skills – Fine motor skills
Materials:
- Coloured paper/chart paper/old newspaper
- Paints/crayons
- Scissors
- Glue
- Pencil
Instructions:
- Let’s begin by tracing out long triangles to make the crows. Use grey coloured paper, plain chart paper or newspaper sheets.
- Draw 2 – 3 triangles that are 3 inches long at the base, with two arms that are about 4 to 5 inches long. Cut them out carefully.
- If using chart paper or newspaper, help your child colour both sides of the triangles in grey colour (paint or crayons, whichever he prefers!).
- Once that’s done, carefully fold over the narrow tip of each triangle (refer to image). Help your child glue down the folded top. This is now the head of the crow.
- To make the orange beak, cut out a small triangle from orange coloured paper, and paste it on the crow’s face. If using chart paper or newspaper, colour the cut-out in orange paint, and then paste it.
- Next, draw a pair of eyes above the orange beak. Colour in the white and black parts with paint (refer to image).
- As the paint dries, take more sheets of paper to draw the crow wings. To do this, fold over your choice of paper to make two layers. Then, ask your child to put his hand flat on the paper and help him trace it out! Cut out the tracing through the two layers, and then help your child paint/colour it in black.
- Lastly, paste the wings at the back of the crow’s body.
- If you like, you can take a big sheet of paper, draw a tree with some branches, and paste the crows on the tree!
The paper crows are ready for display! Did your child have tons of fun with this project?
ADVERTISEMENTS


