


ADVERTISEMENTS
A cute little toy-making activity to do with your little one!
Thank you for reading this post, don't forget to subscribe!
Age Range – 3 – 4 years
Primary Skills – Fine motor skills, hand-eye coordination

Materials:
- Coloured paper/plain paper
- Scissors
- Glue
- Paints
- Pencil
Instructions:
ADVERTISEMENTS
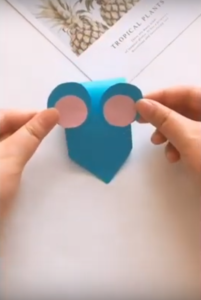
- Cut out a medium-length (approx. 12 – 15 cm) and medium-width (approx. 4 – 5 cm) strip of paper. If using plain paper, let your child paint over the strip with any colour he likes.
- Next, fold over the strip to make a big loop, with the ends slightly on top of the other. Help your child glue them together. This is now the body of the mouse.
- To make the shape of the nose, carefully snip a V-shape at the glued ends.
- Next, to make the ears, cut out two circles (in proportion with the body of the mouse) of the same colour as the body, and two smaller circles of a different colour. Let your child glue a smaller circle onto the bigger circle. Paste on the body as shown in the image below.
- To make the eyes, you can either cut out small white circles with the pupils coloured in with black paint or marker, or you can draw them directly onto the body of the mouse (see image for reference).
- Next, let’s make the nose and whiskers. Take black coloured paper, or plain paper painted black, and cut out a small circle and 6 short, thin strips. Stick 3 strips each on each side of the circle. Paste the completed look on the V-shape of the mouse’s nose.
- Lastly, draw and cut out a curved tail, and glue it to the other end of the mouse’s body.
Your mouse toy is ready! Did your child have fun with this craft project, Mom and Dad?
ADVERTISEMENTS


